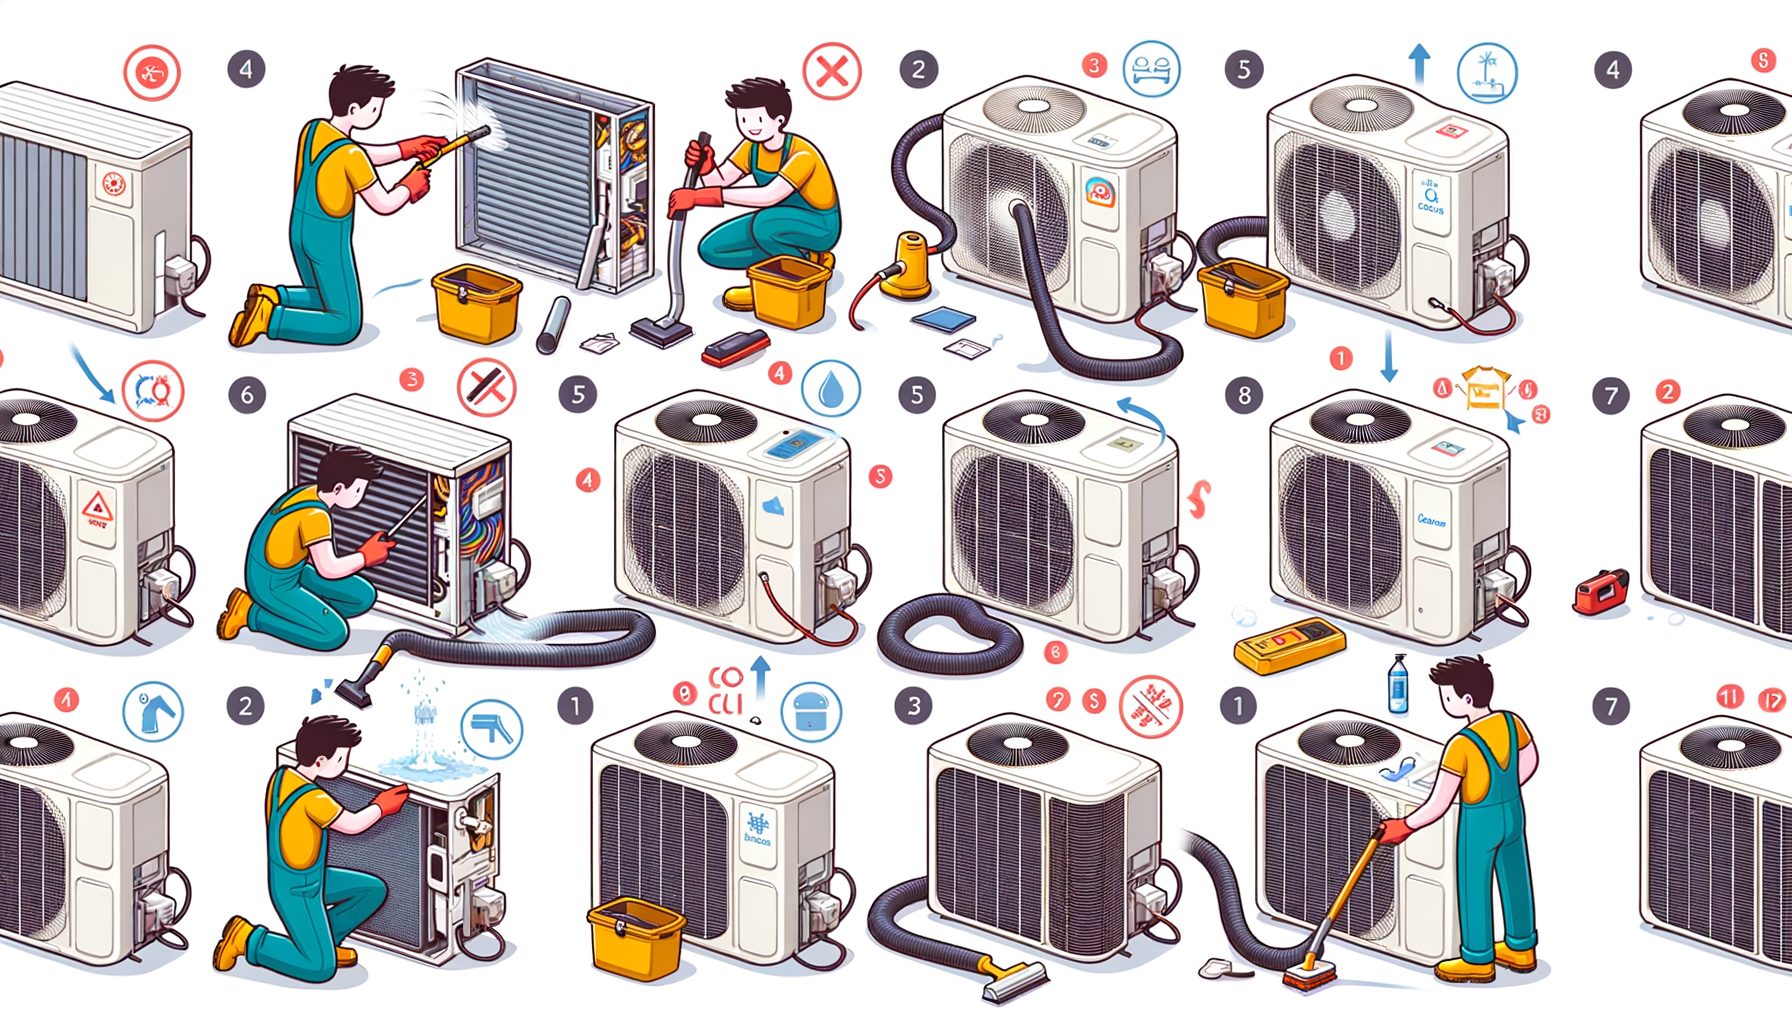
Your air conditioner may be working harder—and costing more—simply because it’s dirty. Dust-clogged filters, grimy coils, and blocked drains sap cooling power, inflate energy bills, and can shorten equipment life. The upside? With a careful, step-by-step approach, AC indoor and outdoor units can be cleaned safely at home. In the guide below, you’ll see how to prepare, which tools to use, and the order to tackle each part—so airflow improves, supply air gets colder, and energy use drops without harming sensitive components.
Safety and Preparation: What to Do Before You Clean
Safety comes first. Powering the system down prevents shocks and shields electronics from moisture. Turn the thermostat off, then shut off the breaker for the air handler (indoor unit) and the disconnect for the condenser (outdoor unit). If there’s a wall switch near the furnace or air handler, switch that off as well. Wait at least five minutes so capacitors can discharge. Unsure which breaker controls the unit? Once you confirm, label it for next time.
Collect your tools before you begin. Most homeowners need a soft brush, microfiber cloths, a gentle garden-hose spray nozzle, a non-acid, aluminum-safe coil cleaner (or mild dish soap diluted in water), a spray bottle, a wet/dry vacuum, white vinegar, a small bucket, and basic screwdrivers. Bent fins outside? A fin comb can straighten them to restore airflow. Then this: wear nitrile gloves and safety glasses. Skip pressure washers and harsh chemicals that can damage fins, paint, and seals.
Consult the manufacturer’s manual for model-specific guidance. Indoor units vary—ducted air handlers vs. wall-mounted mini-splits—and access panels, filter sizes, and cleaning recommendations differ. No paper manual on hand? Search your model number on the manufacturer’s site. While reading, note cleaner restrictions and no-spray zones. Also review your warranty; some brands require non-caustic, non-acid products for coil cleaning.
Set up the work area. Indoors, place towels or a tray under the air handler to catch drips. For mini-splits, a service bag makes cleanup easier. Cover nearby electronics and clear clutter around return grilles. Outdoors, trim plants and keep 30–60 cm (12–24 inches) of open space around the condenser so you can work comfortably. Choose a mild, dry day—direct sun can evaporate cleaners too fast, and strong winds can blow debris back into the unit.
Before removing panels or disconnecting anything, snap a few photos. Reassembly goes faster when you can check a picture. Keep screws in a cup or a small zip bag for each panel. With power off, tools ready, and a plan in place, you’re set to clean effectively and safely.
How to Clean the Indoor Unit: Filters, Evaporator Coil, and Drain
Focus indoors on three areas: the air filter, the evaporator coil, and condensate drainage. Begin with the filter because it sets the airflow baseline. Slide it out from the return grille or the air handler. Disposable? Replace it with the correct size and MERV rating recommended for your system (typical homes use MERV 8–13; very high MERVs can restrict airflow if the system isn’t designed for them). Washable (common on mini-splits)? Vacuum loose dust and rinse with lukewarm water opposite the airflow direction. Let it dry completely—never reinstall a damp filter.
Move on to the evaporator coil. Remove the indoor access panel to expose the coil face. You’ll likely see fine aluminum fins with a film of dust. Using a soft brush, gently loosen dry debris with light, vertical strokes to avoid bending fins. Mist the coil with a no-rinse evaporator coil cleaner or a mild soapy solution—just enough to wet the fins, keeping spray away from electronics. Observe the product’s dwell time (often 5–10 minutes). As the cleaner breaks down biofilm and oily particles, condensate will carry them to the drain. Wipe edges and reachable surfaces with a microfiber cloth. If fins bend, straighten them with a fin comb for even airflow.
Clear the condensate pan and drain line to prevent leaks and musty odors. Wipe the pan to remove slime. Slowly pour 120–240 ml (1/2–1 cup) of white vinegar into the drain to help control algae. If the drain is clogged (water sits in the pan), attach a wet/dry vacuum to the outdoor drain termination and draw until clear; expect dirty water and debris. Pour a little water into the pan to confirm steady flow. If your system uses a condensate pump, verify that it activates and discharges properly.
Check the blower wheel if it’s visible. A thin dust coating is normal; a thick, sticky layer reduces airflow and can cause noise. Light dusting with a brush is fine. Heavy buildup, especially on mini-splits where the blower is tedious to access, is a sign to schedule a professional deep clean.
Put the panels back on, reinstall the dry filter, and restore power. Let the system run. Airflow should be smooth, and air from the supply vents should feel noticeably cooler within a few minutes. Under normal conditions, a typical split system shows a temperature drop of about 8–11°C (15–20°F) between return and supply air. Hear gurgling in the drain or see water where it shouldn’t be? Power off and recheck the pan and line.
Done regularly, the indoor routine boosts air quality and efficiency. The U.S. Department of Energy reports that replacing a dirty filter can cut energy use by 5–15%—savings that add up over a season. The evaporator is also protected from icing, and component life is extended.
How to Clean the Outdoor Unit: Condenser Coil, Fins, and Fan
The outdoor unit’s job is to dump heat. When its coil is matted with lint, cottonwood, or dust, your AC runs longer and works harder. With power off at the disconnect, remove leaves and trash around the unit. Keep 30–60 cm (12–24 inches) of clear space on all sides and at least a meter (3 feet) above. Trim shrubs and move stored items to keep airflow unobstructed.
Remove the top grille or side panels if your design allows. Support the fan assembly carefully; don’t pull on wires. Vacuum out leaves and dirt from the base. Inspect the coil walls—the thin aluminum fins clog easily. Using a soft brush, sweep lightly in the direction of the fins. Horizontal strokes can bend or tear them, so avoid those. Crushed sections from impacts? A fin comb can help straighten them and improve airflow.
Pre-wet the coil with a gentle water spray so cleaner spreads evenly. Apply a condenser-safe coil cleaner (non-acid, aluminum-safe) and follow the labeled dwell time. Rinse with a garden hose on low pressure. For best results, rinse from the inside out so debris is pushed back the way it came in. Keep water away from the control box and capacitor. What’s interesting too: pressure washers flatten fins and can force water into bearings and electronics, so don’t use them.
With the top off, look over the fan blades for dirt buildup and the base pan for blocked drain holes. Clean both. Spin the fan by hand to feel for roughness; if it feels gritty or wobbly, have a technician check the motor and bearings. Examine insulation on the refrigerant lines; cracked or missing insulation should be replaced to prevent energy loss and sweating.
Reassemble the unit, restore power, and run the AC. The fan should start smoothly, and within a minute you should feel warm air exhausting from the top or side—proof that heat is moving out of your home. After a proper cleaning, the system should cycle more efficiently, especially during hot afternoons when the condenser works hardest.
Own a heat pump? Occasional light frost in cool weather is normal. Heavy icing that doesn’t melt during defrost indicates a problem. Well, here it is: don’t chip ice off coils; that can cause leaks. Instead, switch the unit off and call a professional for diagnosis.
Maintenance Schedule, Energy Savings, and When to Call a Pro
Consistency locks in the benefits of a thorough cleaning. Make a simple plan and set calendar reminders. Replace or wash filters every 1–3 months during heavy use. Clean the indoor coil and drain annually at minimum, or twice per year in dusty or humid climates. Rinse the outdoor coil at the start of cooling season and again mid-season if pollen, cottonwood, or construction dust is common. Keep 30–60 cm (12–24 inches) of clearance around the condenser year-round. Small habits curb breakdowns and keep energy use in check.
How much can you save? The U.S. Department of Energy notes that replacing clogged filters can lower AC energy consumption by 5–15%. Clean coils restore heat transfer and airflow, often translating to shorter run times and better comfort. Results vary by climate and system size, but many households notice fewer “can’t keep up” afternoons after cleaning both coils and confirming proper drainage.
Having a pro service the system is smart insurance. A technician measures refrigerant pressures, checks electrical components, tests safety controls, and verifies airflow—tasks beyond typical DIY. Expect roughly $100–$300 for a preseason tune-up in many regions. That visit can catch early issues like a weak capacitor or a slow condensate pump before they cause a hot-day failure. Note that in many countries, handling refrigerants requires certification (for example, EPA Section 608 in the U.S.).
Here’s a quick planning table you can reference:
| Task | Recommended Frequency | Time Needed | Potential Impact |
|---|---|---|---|
| Replace/Wash Filters | Every 1–3 months | 5–10 minutes | 5–15% energy savings (DOE) |
| Clean Indoor Coil & Drain | Every 6–12 months | 45–90 minutes | Prevents leaks, improves airflow |
| Rinse Outdoor Coil | Start and mid cooling season | 30–60 minutes | Better heat rejection, shorter cycles |
| Professional Tune-Up | Annually | 60–90 minutes | Checks refrigerant, electrical, safety |
Know when to stop and call a pro. Red flags include ice on the indoor coil or outdoor lines, repeated breaker trips, burnt smells, visible oil stains on refrigerant lines (possible leak), hissing or bubbling sounds, and weak airflow even after filter and coil cleaning. Also call for blower wheel heavy buildup, water leaks you can’t resolve after clearing the drain, or if a smart thermostat reports persistent system errors. Quick action protects your compressor and keeps repair costs down.
Quick Q&A
Q: How often should I clean AC indoor and outdoor units? A: Swap or wash filters every 1–3 months, clean the indoor coil and drain yearly, and rinse the outdoor coil at least at the start of the cooling season. In dusty or humid environments, increase frequency.
Q: Can I use a pressure washer on my condenser? A: No. High pressure flattens fins, forces water into motors and controls, and can void warranties. Use a gentle garden-hose spray and an aluminum-safe coil cleaner.
Q: Is vinegar safe for the drain line? A: Yes. Pouring 1/2–1 cup of white vinegar into the condensate drain helps control algae and biofilm. Do not mix vinegar with bleach or other chemicals.
Q: What filter MERV rating should I choose? A: Follow your system’s specifications. Many homes do well with MERV 8–13. Higher MERV filters capture finer particles but can reduce airflow in systems not designed for them.
Conclusion
You’ve now seen how a careful, step-by-step approach lets you clean AC indoor and outdoor units safely and effectively. The strategy is simple: power off, prep your tools, restore clean airflow indoors (filter, evaporator, drain), and give the condenser outside a proper rinse and fin check. These tasks prevent common problems—leaks, icing, and weak cooling—while trimming energy use and protecting the compressor. With a couple of hours and basic supplies, most homeowners can noticeably improve comfort and system efficiency.
Ready for next steps? Put a reminder in your calendar to wash or replace filters every 1–3 months. Pick a mild day this week to rinse the outdoor coil and clear the area around it. If the indoor coil and drain haven’t been cleaned in a year, plan a session now—or schedule a professional tune-up to start the season fresh. If you ran into red flags—strange noises, ice, or leaks—turn the system off and call a qualified technician before further damage occurs.
Small, consistent maintenance pays off: cleaner air, quieter operation, and lower bills throughout the summer. If this guide helped, share it with a friend or neighbor who could use cooler air and lower costs, and bookmark it for your next seasonal refresh. Your AC doesn’t need to struggle—give it a clean pathway to move heat, and it will reward you with reliable comfort.
Feel like making a quick difference? Set a 30-minute timer, grab your tools, and start with the filter. One simple action can kick off a cooler, more efficient home. What’s the first maintenance task you’ll tackle today?
Helpful Resources
U.S. Department of Energy – Energy Saver tips for heating and cooling: https://www.energy.gov/energysaver
EPA – Indoor Air Quality basics: https://www.epa.gov/indoor-air-quality-iaq
Air Conditioning Contractors of America (ACCA) – Homeowner HVAC guidance: https://www.acca.org/homeowners
EPA Section 608 (U.S.) – Refrigerant handling certification info: https://www.epa.gov/section608
Sources
U.S. Department of Energy, Energy Saver: Maintaining Your Air Conditioner and Heat Pump. Accessed 2025. https://www.energy.gov/energysaver
EPA, Indoor Air Quality. Accessed 2025. https://www.epa.gov/indoor-air-quality-iaq
Air Conditioning Contractors of America (ACCA). Accessed 2025. https://www.acca.org/homeowners